1.1 图形化编程的定义与价值
图形用户界面(GUI)编程是通过可视化元素(窗口、按钮、菜单等)实现用户与程序交互的开发方式。Python作为一门通用编程语言,提供了多种GUI开发方案,使开发者能够创建跨平台的桌面应用程序。
1.2 Python GUI应用场景举例
2.1 Tkinter - Python标准GUI库
2.1.1 基本概念
Tkinter是Python的标准GUI库,基于Tk GUI工具包,无需额外安装。
类原型示例:
class tkinter.Tk(screenName=None, baseName=None, className='Tk', useTk=1)
# 功能:创建主窗口
# 参数:className - 窗口类名
# 返回值:Tk实例
编程技巧:
- 使用
grid()布局管理器替代pack()实现复杂布局
注意事项:
2.1.2 应用示意:简易文本编辑器
import tkinter as tk
from tkinter import filedialog

classTextEditor:
    def__init__(self, root):
        self.root = root
        self.root.title("Tkinter文本编辑器")
        self.text_area = tk.Text(root)
        self.text_area.pack(fill=tk.BOTH, expand=1)

        menu_bar = tk.Menu(root)
        file_menu = tk.Menu(menu_bar, tearoff=0)
        file_menu.add_command(label="打开", command=self.open_file)
        file_menu.add_command(label="保存", command=self.save_file)
        menu_bar.add_cascade(label="文件", menu=file_menu)
        root.config(menu=menu_bar)

    defopen_file(self):
        file_path = filedialog.askopenfilename()
        if file_path:
            withopen(file_path, 'r') as file:
                content = file.read()
                self.text_area.delete(1.0, tk.END)
                self.text_area.insert(tk.END, content)

    defsave_file(self):
        file_path = filedialog.asksaveasfilename()
        if file_path:
            withopen(file_path, 'w') as file:
                file.write(self.text_area.get(1.0, tk.END))

if __name__ == "__main__":
    root = tk.Tk()
    app = TextEditor(root)
    root.mainloop()
2.2 PyQt/PySide - 专业级GUI框架
2.2.1 核心概念
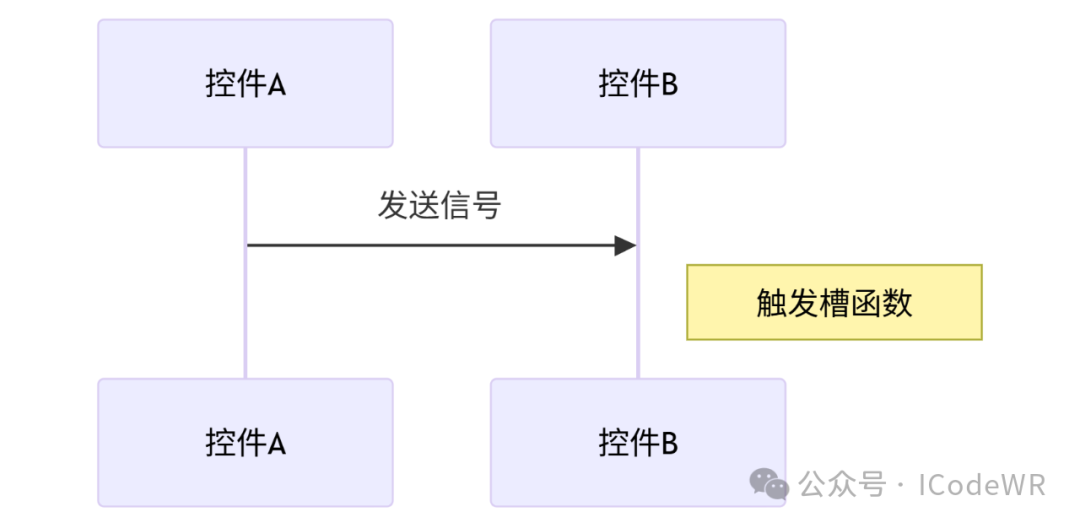
PyQt和PySide都是Qt框架的Python绑定,功能强大且跨平台。
关键模块:
信号与槽机制:
2.2.2 原型与参数
# PyQt5按钮类原型
class QPushButton(QAbstractButton):
    def __init__(self, parent: QWidget = None)
    def __init__(self, text: str, parent: QWidget = None)
    def __init__(self, icon: QIcon, text: str, parent: QWidget = None)

# 功能:创建按钮控件
# 参数:
#   text - 按钮文本
#   icon - 按钮图标
#   parent - 父控件
编程技巧:
- 使用Qt Designer设计界面,
.ui文件转.py
注意事项:
- 商业应用需注意许可证(PyQt-GPL/PySide-LGPL)
2.2.3 应用示意:数据可视化仪表盘
import sys
from PyQt5 import QtWidgets, QtChart
from PyQt5.QtCore import Qt

classDashboard(QtWidgets.QMainWindow):
    def__init__(self):
        super().__init__()
        self.setWindowTitle("PyQt数据仪表盘")
        self.resize(800, 600)

        # 创建图表视图
        chart_view = QtChart.QChartView()
        chart_view.setRenderHint(QtGui.QPainter.Antialiasing)

        # 创建图表
        chart = QtChart.QChart()
        chart.setTitle("销售数据")

        # 创建系列
        series = QtChart.QBarSeries()
        bar_set = QtChart.QBarSet("季度")
        bar_set.append([120, 150, 180, 200])
        series.append(bar_set)
        chart.addSeries(series)

        # 坐标轴
        categories = ["Q1", "Q2", "Q3", "Q4"]
        axis_x = QtChart.QBarCategoryAxis()
        axis_x.append(categories)
        chart.addAxis(axis_x, Qt.AlignBottom)
        series.attachAxis(axis_x)

        axis_y = QtChart.QValueAxis()
        axis_y.setRange(0, 250)
        chart.addAxis(axis_y, Qt.AlignLeft)
        series.attachAxis(axis_y)

        chart_view.setChart(chart)
        self.setCentralWidget(chart_view)

if __name__ == "__main__":
    app = QtWidgets.QApplication(sys.argv)
    window = Dashboard()
    window.show()
    sys.exit(app.exec_())
2.3 wxPython - 操作系统原生GUI库
2.3.1 框架特点
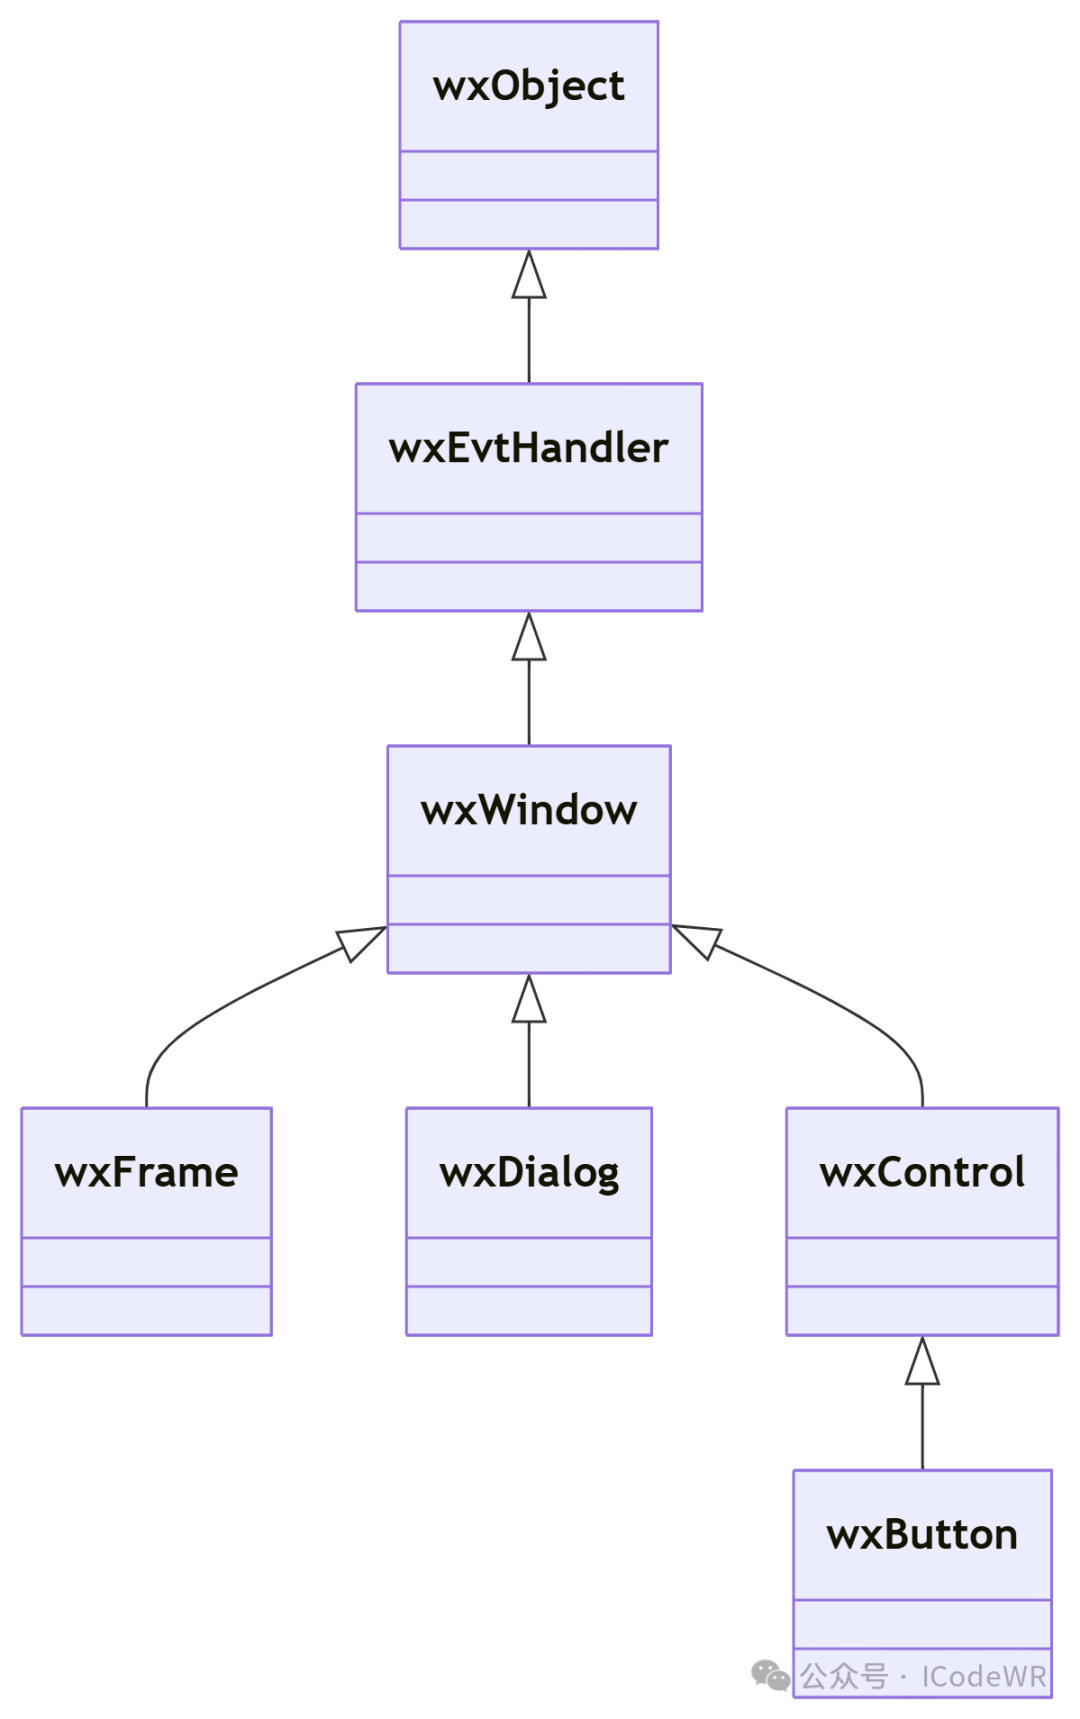
wxPython基于wxWidgets C++库,提供原生操作系统外观的GUI。
核心优势:
类层次结构:
2.3.2 应用示例:图像浏览器
import wx
import wx.lib.agw.thumbnailctrl as tc

classImageViewer(wx.Frame):
    def__init__(self):
        super().__init__(None, title="wxPython图像浏览器", size=(800, 600))
        panel = wx.Panel(self)

        # 创建缩略图控件
        self.thumbnails = tc.ThumbnailCtrl(
            panel,
            image_handler=tc.NativeImageHandler
        )

        # 按钮
        open_btn = wx.Button(panel, label="打开目录")
        open_btn.Bind(wx.EVT_BUTTON, self.on_open_dir)

        # 布局
        sizer = wx.BoxSizer(wx.VERTICAL)
        sizer.Add(open_btn, 0, wx.ALL, 5)
        sizer.Add(self.thumbnails, 1, wx.EXPAND|wx.ALL, 5)
        panel.SetSizer(sizer)

    defon_open_dir(self, event):
        dialog = wx.DirDialog(self, "选择图片目录")
        if dialog.ShowModal() == wx.ID_OK:
            self.thumbnails.ShowDir(dialog.GetPath())

if __name__ == "__main__":
    app = wx.App()
    frame = ImageViewer()
    frame.Show()
    app.MainLoop()
3.1 Kivy - 跨平台触控界面
3.1.1 核心特性
- 跨平台(Win/macOS/Linux/Android/iOS)
KV语言示例:
<MyButton@Button>:
    background_color: 0.2, 0.6, 0.8, 1
    color: 1, 1, 1, 1
    font_size: 24

BoxLayout:
    orientation: 'vertical'
    MyButton:
        text: '按钮1'
    MyButton:
        text: '按钮2'
3.1.2 应用示例:触控绘图板
from kivy.app import App
from kivy.uix.widget import Widget
from kivy.graphics import Color, Line

classDrawingCanvas(Widget):
    defon_touch_down(self, touch):
        withself.canvas:
            Color(0, 0.5, 1)
            touch.ud['line'] = Line(points=(touch.x, touch.y), width=3)

    defon_touch_move(self, touch):
        touch.ud['line'].points += [touch.x, touch.y]

classDrawingApp(App):
    defbuild(self):
        return DrawingCanvas()

if __name__ == "__main__":
    DrawingApp().run()
3.2 Dear PyGui - 高性能即时模式GUI
3.2.1 核心优势
基本模式对比: 表1:GUI模式比较
3.2.2 应用示例:实时数据监控
import dearpygui.dearpygui as dpg
import random
import time

# 创建上下文
dpg.create_context()

# 创建窗口
with dpg.window(label="实时数据监控", width=600, height=400):
    dpg.add_text("CPU使用率监控", tag="title")
    dpg.add_plot(label="CPU使用率", height=300, tag="plot")
    dpg.add_line_series([], [], tag="series", parent="plot")

# 数据更新回调
defupdate_data():
    timestamps = dpg.get_value("series")[0]
    values = dpg.get_value("series")[1]

    # 添加新数据点
    new_time = time.time()
    new_value = random.randint(0, 100)

    timestamps.append(new_time)
    values.append(new_value)

    # 保留最近100个点
    iflen(timestamps) > 100:
        timestamps.pop(0)
        values.pop(0)

    dpg.set_value("series", [timestamps, values])

# 主循环
dpg.create_viewport(title='Dear PyGui 监控', width=800, height=600)
dpg.setup_dearpygui()
dpg.show_viewport()

while dpg.is_dearpygui_running():
    update_data()
    dpg.render_dearpygui_frame()

dpg.destroy_context()
4.1 关键因素分析
表2:GUI库选型矩阵
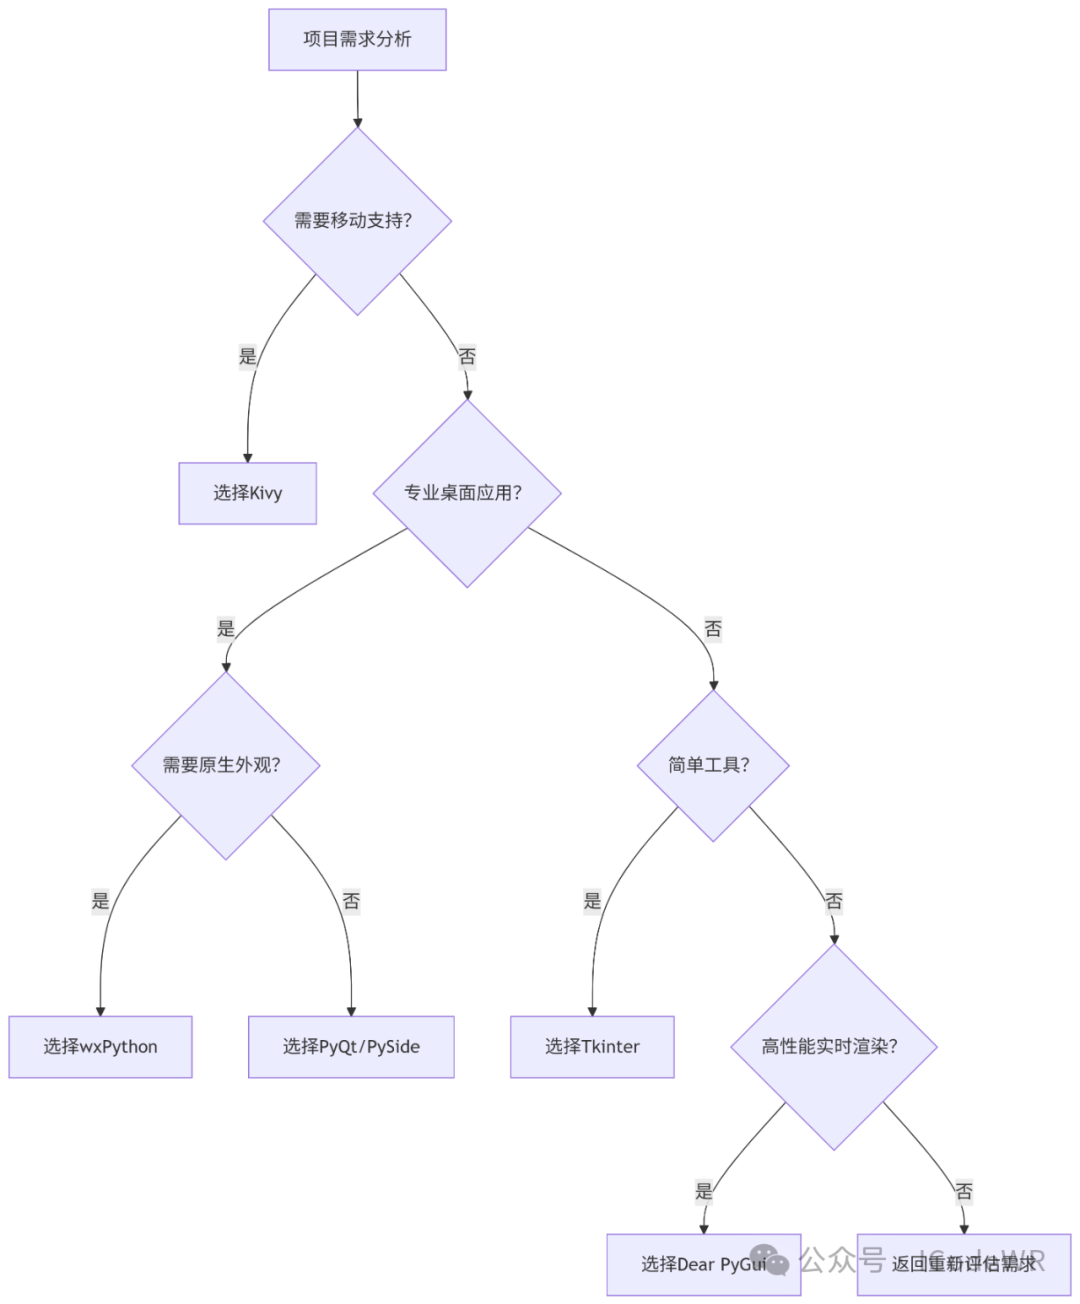
4.2 选型流程参考
进阶方向
架构设计:
性能优化:
跨平台适配:
与Web技术集成:
Python图形化编程提供了从简单到专业的多种解决方案,开发者应根据项目需求选择合适的工具:
- Tkinter:快速原型、小型工具的最佳选择
- PyQt/PySide:开发专业级跨平台桌面应用
- wxPython:需要原生操作系统外观的应用
- Kivy:触控界面和跨平台移动应用
- Dear PyGui:高性能实时数据可视化
核心建议:
- 掌握至少一个专业级框架(PyQt/wxPython)
随着Python生态的不断发展,GUI编程领域也在持续创新。现代方案如Dear PyGui展示了Python在实时可视化方面的潜力,而Web技术集成则开辟了混合开发的新路径。
阅读原文:原文链接
该文章在 2025/7/18 10:53:39 编辑过


 400 186 1886